Click to view our Accessibility Statement or contact us with accessibility-related questions


PRODUCTS YOU MAY LIKE


Trending Posts in Mechanical Keyboards


lwthunder
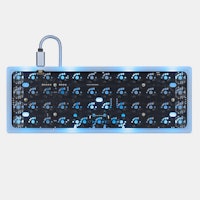
Drop CTRL V2 Mechanical Keyboard PCBA
If I want some hot-swap socket for replacement, where I can buy to ensure it fits this PCBA?
Apr 17, 2024

ThereminGoatMK
Do I Need to Lube My Keyboard Switches?
Figure 1: Sometime around here is a good time to ask that question... If you’re new to the mechanical keyboard hobby, I have no doubt that planning your first keyboard build is a bit of a daunting task. To be entirely honest with you, it’s only a tiny bit less daunting for your second or even third keyboard builds should you stay around a little while longer. You’ve got the keyboard itself to worry about, stabilizers, keycaps, and even switches on top of all of the intangible marks you want your dream keyboard to hit. Switches are especially daunting right out of the gate as there’s just so many options out there to pick from – each with their own unique specifications, manufacturers, and more. Yet, in spite of all of these differences between switches, time and time again I find people always asking about lubing switches as one of their chief concerns when it comes to picking some up. With countless numbers of content creators talking about lubing switches, its no...
Apr 17, 2024


TiKiToPia
Keyboard & Drink
Playful set
This set goes better for keyboards meant for personal-casual setups as opposed to office-work environments.
Apr 14, 2024
Keyboy
help Momoka zoo 65
What is the diameter and length of the screws for the momoka zoo 65
Apr 14, 2024
jtgas23
ALT V2 not detected with Drop Keyboard Configurator
Hi, This is my first non-mac keyboard. I was under the impression that this would work out of box with with mac desktop however I am having issues getting the ALT V2 detected with the keyboard configurator software. The keyboard is plugged in and powered on. Apologies if this is very basic or if I have used incorrect language describing my issue, I don't have experience with this. Thank you
Apr 13, 2024
Drop Refurbished
Like-new products you can trustDrop Rewards
Get $5 for every 500 points you earn! Learn more
Drop Keyboard Club
Become a member and expand your keycap collectionCollaborate With Us
For Brands & DesignersFollow Drop
Even so, I highly recommend watching some youtube videos, and practicing by trying to solder some through-hole components (cheap resistors or bits of wire) onto plated protoboard (no need to get one that's this fancy looking, but I just happen to like how it looks: https://www.adafruit.com/products/571). A reasonable iron, some solder, the resistors, and protoboard can be ordered online or picked up at a Radio Shack (or other electronics store) for less than 20-30 bucks...much less than buying two plancks and throwing one away if you make a lot of soldering mistakes :).
As for switch types, I believe the closest "Zealios" to "MX Clears" are the 78g ones, based on all of the various forum/reddit posts about Zealios. the 65g ones will probably be closer to an "MX Brown" switch but with the better tactile bump of the "MX Clear"... ^--I could also be completely wrong about the zealios, this is just my understanding from what I've read online, I have not actually tried zealios yet (though I did order some 67 and 78g ones :))
If you're nervous about soldering, some things to keep in mind: *You're feeding solder into the joint, so make sure there is enough clearance between your fingers and the soldering iron. It's easy to forget when you're concentrating on soldering to "restock" the solder. On that note: *Give yourself plenty of solder to work with. Trying to conserve solder is false economy. *With this kit, heat one side of the leads for a few seconds and apply solder on the opposite side of the lead. WAIT FOR THE LEAD TO MELT THE SOLDER. Don't let the iron melt the solder. *If you get a "cold joint", apply flux and reheat the joint. *In fact, apply flux to all joints before you start soldering. Flux cleans the metal as it's heated. This is good for melting the solder onto the metal. *Clean your soldering iron often by "tinning the tip". This means using a wet sponge to wipe away soot and applying a small amount of solder to the iron tip itself. Wipe away extra solder onto the sponge. *Use lead based solder. Don't waste your time with the other stuff.
Just some things to get you started. Practice kits are a great idea. Get flux too. Just realize the smaller boards might be a little hard to control since you're pushing a soldering iron against them. Good luck!